ページ

ラベル WPF の投稿を表示しています。 すべての投稿を表示

2011年11月13日日曜日

◆WPF バインディング2

<オブジェクトとのバインディング>

今度は、コントロール同士ではなくコードビハインド側で作成したオブジェクトとコントロールをバインドしてみる。

とりあえず、画面表示用に以下のXAMLを定義した。

<Window x:Class="BindingSample.Window2"
xmlns="http://schemas.microsoft.com/winfx/2006/xaml/presentation"
xmlns:x="http://schemas.microsoft.com/winfx/2006/xaml"
Title="Window2" Height="300" Width="300" Name="MyWindow">
<StackPanel>
<StackPanel Orientation="Horizontal">
<Label Content="名前:"/>
<TextBox Text="{Binding Name}" />
</StackPanel>
<StackPanel Orientation="Horizontal">
<Label Content="住所:"/>
<TextBox Text="{Binding Address}" />
</StackPanel>
</StackPanel>
</Window>

image


バインドするエンティティのクラスはとりあえず以下のとおり。


    class Person
{
public string Name { get; set; }
public string Address { get; set; }
}

あとはコードビハインドで、このクラスのインスタンスを作り、WindowのContextに設定してあげれば良い。


        public Window2()
{
InitializeComponent();

Person p = new Person { Name = "原 辰徳", Address = "相模原市1-1" };
this.MyWindow.DataContext = p;
}

バインド先のTextBoxは自分の親を直近から探していって最初に見つかったDataContextを使う。(包含継承というらしい)


image


コントロールの時と同様にコードだけでバインドすると以下のようになる。


        public Window2()
{
InitializeComponent();

Person p = new Person { Name = "原 辰徳", Address = "相模原市1-1" };
//this.MyWindow.DataContext = p;
var bindName = new Binding();
bindName.Path = new PropertyPath("Name");
bindName.Source = p;
txtName.SetBinding(TextBox.TextProperty, bindName);

var bindAddr = new Binding();
bindAddr.Path = new PropertyPath("Address");
bindAddr.Source = p;
txtAddr.SetBinding(TextBox.TextProperty, bindAddr);
}

9行目と14行目はDataContextを指定すれば不要になる。
また、Bindingクラスのコンストラクタ引数にPathを文字列で指定できるようなので8行目と13行目も省略できることになる。


        public Window2()
{
InitializeComponent();

Person p = new Person { Name = "原 辰徳", Address = "相模原市1-1" };
this.MyWindow.DataContext = p;
var bindName = new Binding("Name");
txtName.SetBinding(TextBox.TextProperty, bindName);

var bindAddr = new Binding("Address");
txtAddr.SetBinding(TextBox.TextProperty, bindAddr);
}

少し簡単になった。


ちなみに、バインドモードは指定しなければDefaultという値になり状況に応じてWPFが決めてくれるらしい。TextBoxの様に入力可能なコントロールとバインドした場合は双方向になるとのこと。
ただし、TextBoxは依存関係プロパティになっていて変更通知機能があるのでTextBoxの変更をDataContextに伝えることができるが、DataContextへの変更はそのままではTextBoxに伝わらないのだと。


一般的にはDataContextに指定されたCLRオブジェクトに対してはINotifyPropertyChangedインタフェースを実装することにより変更通知を行う必要がある。


とりあえずDataContextの値を確認する為にボタンを追加してソースを以下の様に変更した。


image


    public partial class Window2 : Window
{
Person p = new Person { Name = "原 辰徳", Address = "相模原市1-1" };
public Window2()
{
InitializeComponent();

this.MyWindow.DataContext = p;
var bindName = new Binding("Name");
txtName.SetBinding(TextBox.TextProperty, bindName);

var bindAddr = new Binding("Address");
txtAddr.SetBinding(TextBox.TextProperty, bindAddr);
}
//DataContextの値を確認
private void Button_Click(object sender, RoutedEventArgs e)
{
MessageBox.Show(p.Name + ":" + p.Address,"DataContextの確認");
}
//名前を長島に
private void Button_Click_1(object sender, RoutedEventArgs e)
{
p.Name = "長島茂雄";
}
}


これで確認してみると確かにDataContextへの変更はTextBoxに反映しないことが分かった。


DataContextに設定しているPersonクラスにINotifyPropertyChangedインタフェースを実装したのが以下のソース。
PropertyChangedイベントを発せさせれば良いだけだ。
(まったく決まりきった実装になるようだ)


    public class Person : INotifyPropertyChanged
{
private string _name;
private string _address;
public string Name
{
get
{
return _name;
}
set
{
if (_name == value)
{
return;
}
_name = value;
OnPropertyChanged("Name");
}
}
public string Address
{
get
{
return _address;
}
set
{
if (_address == value)
{
return;
}
_address = value;
OnPropertyChanged("Address");
}
}

public event PropertyChangedEventHandler PropertyChanged;
protected void OnPropertyChanged(string propertyName)
{
var d = PropertyChanged;
if (d != null)
{
d(this, new PropertyChangedEventArgs(propertyName));
}
}
}

確かにDataContextへの変更が即座にTextBoxへ反映されるようになる。


image

2011年11月6日日曜日

◆WPF バインディング

<コントロール同士のバインディング>

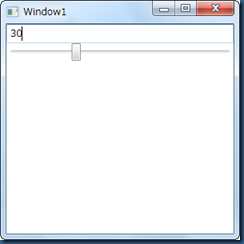
まずは、WPFのバインディングで最初の頃必ず出てきたテキストボックスとスライダーのバインディング。
スライダーを動かすと数値が変化し、数値を入力するとスライダーが動くというやつだ。(双方向のバインディング)
image

XAMLはこんな感じになる。

<Window x:Class="BindingSample.Window1"
xmlns="http://schemas.microsoft.com/winfx/2006/xaml/presentation"
xmlns:x="http://schemas.microsoft.com/winfx/2006/xaml"
Title="Window1" Height="300" Width="300">
<StackPanel>
<TextBox Name="myValue">0</TextBox>
<Slider Maximum="100" Minimum="0" Value="{Binding ElementName=myValue, Path=Text}" />
</StackPanel>
</Window>

スライダーのvalueプロパティにテキストボックスのTextプロパティをバインディングするには、
Value="{Binding ElementName=myValue, Path=Text}"
というようにバインドするコントロール名とプロパティ名を指定してあげる。
ちなみに、この{}で囲んだ書き方は「マークアップ拡張」と呼ばれるXAML独自の記法(多分)で、本来は以下のように書くべきもの。


        <Slider Maximum="100" Minimum="0">
<Slider.Value>
<Binding ElementName="myValue" Path="Text" />
</Slider.Value>
</Slider>


多分バインドは多用されることになるためシンタックスシュガー的に簡略記法を用意したのだろう。
ただし、私などは最初この省略形であるということが分からずにどうもピンと来なかった。
というか世の中のサンプルを見ていると様々な記法で書かれており(Pathというキーワードも省略できたり)、一体何が違うのかと混乱していた。
バージョンが上がって省略記法が用意されれば解りやすかったのだが、私のような素人にはちょっと取っ付きづらい部分だった。(最初から気が効きすぎていたというか)
また、上記TextBoxにはNameプロパティで名前を指定しているのだが、これもサンプルによってはx:nameと別のネームスペースを使っていたりして混乱した。
今回再勉強して分かったのは、この名前空間はXAML独自の名前空間らしいということ。WPFとして用意されていない要素、属性などはXAMLとして独自に拡張した機能をこの名前空間で提供しているらしい。
なのでnameプロパティにしてもWPFでもともと存在しているものについてはそれを使えばよいし、nameプロパティを持たないコントロールなどを参照したいときはx:nameで名前をつけてあげれば良い。


データバインドは必ずしも1対1でなくとも良いので、最初のサンプルに省略しない記法で書いたスライダーをもう一つ追加するとこんな感じになる。


<Window x:Class="BindingSample.Window1"
xmlns="http://schemas.microsoft.com/winfx/2006/xaml/presentation"
xmlns:x="http://schemas.microsoft.com/winfx/2006/xaml"
Title="Window1" Height="300" Width="300">
<StackPanel>
<TextBox Name="myValue">0</TextBox>
<Slider Maximum="100" Minimum="0" Value="{Binding ElementName=myValue, Path=Text}" />
<Slider Maximum="100" Minimum="0">
<Slider.Value>
<Binding ElementName="myValue" Path="Text" />
</Slider.Value>
</Slider>

</StackPanel>
</Window>


image


どちらのスライダーを動かしても双方張り付いて全く同じに動く。


ちなみに、このnameプロパティの値はは大文字と小文字が区別され、間違ったりしてもエラーにならないので注意が必要だ。


Bindオブジェクト(要素)はModeプロパティでバインド方向を、
image
UpdateSourceTriggerプロパティでそのタイミングも指定できるようになっている。
image


ここで、こんどはXAMLではなくコードでバインドするとどうなるか試してみた。
Sliderをもう一つ追加し名前を”mySlider”とした。


        <Slider Maximum="100" Minimum="0" Value="{Binding ElementName=myValue, Path=Text}" />
<Slider Maximum="100" Minimum="0">
<Slider.Value>
<Binding ElementName="myValue" Path="Text" />
</Slider.Value>
</Slider>
<Slider Name="mySlider" Maximum="100" Minimum="0" />


        public Window1()
{
InitializeComponent();

var bind = new Binding();
bind.ElementName = "myValue";
bind.Path = new PropertyPath("Text");

mySlider.SetBinding(Slider.ValueProperty, bind);
}


XAMLの省略していない方の記述を見ながらそのとおりにコーディングしていけばよいので、それほど難しくはない。XAMLが入れ子で表現している部分はSetBindingメソッドを使ってあげれば良いようだ。
SliderのプロパティはSlider自身が持っているxxxPropertyスタティックプロパティが使える。
PropertyPathクラスのコンストラクターで指定している引数(型の定義はobjectになっている)も本来はTextBox.TextPropertyなのだと思うがXAMLと同様に”Text”でも動作してくれる。
PropertyPathクラスは以下のような定義になっているので、
[TypeConverterAttribute(typeof(PropertyPathConverter))]
public sealed class PropertyPath
ここで指定されたPropertyPathConverterが文字列からTextPropertyへの変換をしているのかな・・・。


単純に考えれば、文字列を取るコンストラクターを用意すればよいだけに思えるのだが・・・。
そうか、こいつはコンパイル時に変換してくれるという事なのかも。


<自分自身や親要素とのバインド>


        <TextBox Height= "65"
Text="{Binding RelativeSource={RelativeSource Mode=FindAncestor, AncestorType=Window},
Path=Title}"
Width="{Binding RelativeSource={RelativeSource Self}, Path=Height }" />

バインドの対象を指定するのにはnameプロパティを参照する以外にも、このような指定もできる。


2行目では自分の親をたどってWindowコントロールを探し、そのタイトルプロパティとバインドしている。
はっきり言ってちょっと複雑・・・。
それほど使う機能でも無いのでこんなものだとメモしておけば良いか・・・。


4行目はWidthプロパティに対して自分自身のHeightプロパティをバインドしている。(結果的に正方形になる)


ココらへんは記法は面倒だが、当初に比べればだいぶインテリセンスが効いてくれるのですこしは楽になった。

2011年10月30日日曜日

◆WPF FirstBinding

[WPF]レイアウトに飽きてきたのでバインディングしてみる

サンプルは基本的に上記サイトからそのまま引用させてもらっている。

<XAML>

<Window x:Class="DockPanel.MainWindow"
xmlns="http://schemas.microsoft.com/winfx/2006/xaml/presentation"
xmlns:x="http://schemas.microsoft.com/winfx/2006/xaml"
Title="MainWindow" Height="350" Width="525">
<Grid>
<Grid.RowDefinitions>
<RowDefinition Height="Auto" />
</Grid.RowDefinitions>
<Grid.ColumnDefinitions>
<ColumnDefinition Width="Auto" />
</Grid.ColumnDefinitions>

<Label Content="値:" Grid.Row="0" Grid.Column="0" />
<Label Name="valueLabel" Content="ここに値が来ます" Grid.Row="0" Grid.Column="1" />
<Label Content="概要:" Grid.Row="1" Grid.Column="0" />
<Label Name="descriptionLabel" Content="ここに概要が来ます" Grid.Row="1" Grid.Column="1" />
<StackPanel Grid.Row="2" Grid.Column="1" Orientation="Horizontal" >
<Button Name="incrButton" Content="インクリメント" Margin="2" Click="incrButton_Click" />
<Button Name="decrButton" Content="デクリメント" Margin="2" Click="decrButton_Click" />
<Button Name="dumpButton" Content="Dump" Margin="2" Click="dumpButton_Click" />
</StackPanel>

</Grid>
</Window>

<ソース>


using System;
using System.Collections.Generic;
using System.Linq;
using System.Text;
using System.Windows;
using System.Windows.Controls;
using System.Windows.Data;
using System.Windows.Documents;
using System.Windows.Input;
using System.Windows.Media;
using System.Windows.Media.Imaging;
using System.Windows.Navigation;
using System.Windows.Shapes;

namespace DockPanel
{
/// <summary>
/// MainWindow.xaml の相互作用ロジック
/// </summary>
public partial class MainWindow : Window
{
Counter _counter;
BindingExpressionBase _valueBindingExpression;

public MainWindow()
{
InitializeComponent();

//カウンタを作る
_counter = new Counter(){Description="サンプルカウンター"};
InitializeBinding();
}

private void InitializeBinding()
{
Binding valueBinding = new Binding("Value");
_valueBindingExpression = BindingOperations.SetBinding(
valueLabel, Label.ContentProperty, valueBinding);

Binding descriptionBinding = new Binding("Description");
BindingOperations.SetBinding(
descriptionLabel, Label.ContentProperty, descriptionBinding);

// カウンタをDataContextに!
this.DataContext = _counter;
}

class Counter
{
public int Value { get; private set; }
public string Description { get; set; }

public void Incr()
{
Value++;
}
public void Decr()
{
Value--;
}
}

private void incrButton_Click(object sender, RoutedEventArgs e)
{
_counter.Incr();
_valueBindingExpression.UpdateTarget();

}

private void decrButton_Click(object sender, RoutedEventArgs e)
{
_counter.Decr();
_valueBindingExpression.UpdateTarget();

}

private void dumpButton_Click(object sender, RoutedEventArgs e)
{
// カウンタの中身を確認
MessageBox.Show(string.Format("{0}: {1}", _counter.Value, _counter.Description));
}
}
}

バインディングの構文
image


データソースとしてここでは、DataContextに指定したCounterオブジェクトを使用している。
そのDataContextのプロパティ名でBindingオブジェクトを作ってSetBindingするというパターンのようだ。


ソース値の変更を反映するには、値を変更したタイミングでUpdateTargetメソッドを呼んであげる。


Updateを自動的に行うにはデータソースのクラスに
INotifyPropertyChangedインタフェースを実装する。


このインタフェースは以下のイベントの実装を要求する。
event PropertyChangedEventHandler PropertyChanged


イベントを追加したCounterクラスを以下に引用する。

        class Counter:INotifyPropertyChanged
{
private int value;
public int Value
{
get { return value; }
set
{
this.value = value;
OnPropertyChanged("Value");
}
}

private string description;
public string Description
{
get { return description; }
set
{
this.description = value;
OnPropertyChanged("Description");
}
}

public void Incr()
{
Value++;
}
public void Decr()
{
Value--;
}

public event PropertyChangedEventHandler PropertyChanged;
protected void OnPropertyChanged(string name)
{
if (PropertyChanged != null)
{
PropertyChanged(this, new PropertyChangedEventArgs(name));
}
}
}

プロパティが沢山あったら書くのが面倒くさそう。
ほとんどが定型的な処理なので何かしらVSのサポートがあったもよさそうなものだが・・・。
(WPFが浸透して行かない理由の1ではなかろうか。)


個人的には文字列指定の多用も好きになれない。(リフレクションでゴネゴネするらしいが)

2011年10月26日水曜日

◆WPF パネルを使ってコントロールを幾つか追加する

レイアウトに挑戦

Hello World からもう少し進んでWindowに幾つかコントロールを追加する。
Windowsは子どもがひとつしか持てない仕様になっているので、子どもをたくさん持てるパネルコントロールに纏めて配置してから追加する。

パネルコントロールにはGridやStackPanelなど幾つか用意されている。

// need to add System.Xaml.dll , WindowBase.dll , PresentationCore.dll , PresentationFramework.dll
using System;
using System.Collections.Generic;
using System.Linq;
using System.Text;

using System.Windows;
using System.Windows.Controls; //PresentationFramework.dll

namespace WPFFirstPanel
{
class Program:Application
{
[STAThread]
static void Main(string[] args)
{
new Program().Run(new FirstPanelWindow());
}

}

class FirstPanelWindow : Window
{
public FirstPanelWindow()
{
InitializeComponent();
}

private void InitializeComponent()
{
this.Title = "FirstPanel";
this.Height = 400; this.Width = 400;
var stPanel = new StackPanel();
var btn1 = new Button() { Width = Double.NaN, Height = 20, Content = "Hrizontal", Margin = new Thickness(5) };
var btn2 = new Button() { Width = Double.NaN, Height = 20, Content = "Virtical", Margin = new Thickness(5) };
var btn3 = new Button() { Width = 200, Height = 20, Content = "btn3", Margin = new Thickness(5) };
btn1.Click += new RoutedEventHandler((o, e) => { stPanel.Orientation = Orientation.Horizontal; });
btn2.Click += new RoutedEventHandler((o, e) => { stPanel.Orientation = Orientation.Vertical; });

stPanel.Children.Add(btn1); stPanel.Children.Add(btn2); stPanel.Children.Add(btn3);
this.AddChild(stPanel);

this.SizeToContent = SizeToContent.WidthAndHeight;
}
}


}

--


<キーワード>
コードでAutoサイズを指定する
画面サイズを中身のサイズに合わせる

2011年10月25日火曜日

◆Hello XAML

xamlで書いてみよう

今度はXAMLで書いてみるパターンだ。

デフォルトのXAMLファイルを以下のように修正した。
・GridをStackPanelに変更
・StackPanelの子どもにボタンを追加
・ボタンのクリックイベントハンドラーにメッセージボックス表示を追加

2011-10-25 14h12_44

2011-10-25 14h13_43

2011-10-25 13h42_39

この程度のXAMLであればHTML的な知識とWindowsフォームの知識でもまだまだついていける。

2011年10月24日月曜日

◆WPFでHelloWorld

WPF入門してみた

なにはなくともHelloWorld。

基本はコンソールアプリからでしょ、って事でコンソールプロジェクトからWPFフォームをXAMLを使わずに表示してみた。

XAMLを使わなければWindowsフォームとイメージ的にそれほどの違いはない。

using System;
using System.Collections.Generic;
using System.Linq;
using System.Text;

using System.Windows; //added
using System.Windows.Controls; /added

namespace HelloWPF
{
class Program:Application
{
[STAThread]
static void Main(string[] args)
{
new Program().Run(new HelloWindow());
}

class HelloWindow : Window
{
public HelloWindow()
{
this.Title = "Hello WPF!!";
this.Width = 400;
this.Height = 300;
var btn = new Button();
btn.Content = "Show Message";
btn.Click += (sender, e) => { MessageBox.Show("Clicked"); };
this.AddChild(btn);
this.Show();
}
}

}
}

コンソールプロジェクトから作ると参照設定が色々足りないが、コンパイラーの仰せのとおり追加していけば問題ない。

◆WPF再入門

数年前、WPFが出始めの時にちょこちょこ触ったのだが、仕事の関係で最近はずっと放置していた。

WPFはWindowsフォーム等と比べると高機能な分、若干難しいため当時は多少使えたのだが今となっては殆ど忘れてしまった。

特に、当時はあまり体系だった説明をした日本語リソースが無かったために、中身を理解せずにサンプルを真似て動いて満足していた。
なので、忘れるのも早かったと反省しもう少し理論的に理解しながら再入門してみようと思う。

幸い、あれからだいぶ時間が経ったために以下のような詳しい解説も出ている。
WPF入門 - @IT
この記事を理解しながら、当時よく参考にしていたかずきのBlogをもう一度なぞっていこうと思う。

WindowsフォームからWPFへの移行はもっと速い速度で行われると思ったのだが、デスクトップアプリケーションの比率が下がり、HTML5の出現でSilverLightの扱いも微妙になったためか思いの外WPFは浸透していないようだ。
ただし、今後WindowsPhoneが普及するとどうなるかわからないし、どちらにしてもWPF自体はWindowsOSの基本テクノロジーに変わりは無いのでどこかでちゃんと勉強しておかないと・・・。

私が最近チェックした記事